Tuesday 27 August 2013

Inspiration & Soup.

Inspiration can come from just about anywhere.

Where does mine come from you ask?

My biggest inspiration is the woman who gave me life. My mother. 

Momma Rossi really knows her stuff. I always loved to watch her cook. She makes it look so easy and you can tell by watching her that she really loves it. She's taught me the fundamentals of cooking and is always good for a recipe or two. I have placed many a phone calls when things start going weird in the kitchen...she always knows how to fix it! Unless it's really bad and then let's be honest.. no one can fix it. Hey! It happens!

Another woman who inspires me is my Nona. Her lasagna is famous. Actually, all pasta dishes she makes are legendary. The woman knows her pasta. And the sauce... don't even get me started on the sauce.

My Nana is another lady on my list. She makes a mean potato soup and her pink pie is mandatory at all Holiday dinners.

The recipe I'll be sharing today is a combination of both my moms and my nanas' recipe for potato soup. It's a simple recipe, and is perfect for a cold night. . or a muggy, hot night in August.

I'll be sticking to the basics. Usually what I like to do is fry up some bacon to sprinkle on top and then sauté the veggies in the bacon fat... but today I'll be forgoing the bacon for a "lighter" take on this delicious soup. . Yeah right. The only reason I'm not using bacon is because I forgot to buy some.

Okay, here it is.

The Ingredients
(serves 4, or 2 very hungry people)

2 Russet Potatoes
2 Carrots
1 Leek
950ml Chicken Stock (store bought or home-made if you're feeling ambitious)
1/2 cup water (optional)
Olive Oil (or bacon fat!)
Salt & Pepper to taste


     the ingredients


my store bought stock of choice


How to:

Okay, first things first. You have to wash the leek. They tend to get quite dirty (you dirty leek) and the dirt gets trapped in the layers. The easiest way to wash them is to cut off the dark green stocks so that you're left with the light green and white base. Remove the end of the base and then slice the leek in half and then give it a good chop. Once chopped put all the bits into a bowl and give them a good rinse with some cold water. Let them hang out in there for a bit, and make sure that all the dirt gets rinsed off.


Once the leek is all cleaned up, add some oil (about 2 tablespoons) to a Dutch Oven or large sauce pan over medium heat. Add the leek and sauté until nice and soft - about 5 minutes. Add some salt & pepper. (I like to add a little bit of salt after adding each ingredient. I find that it helps build flavor.)


Meanwhile, dice up the potatoes and carrots and add them to the pot. Add a little bit more salt and give it a good stir.


Add the stock and 1/2 cup water (optional. depends on how thick/thin you like your soup) and bring to a boil. Reduce heat and put a lid on it. Let it simmer for 10 minutes or until veggies are soft.


if you liked it then you should of put a lid on it...sorry.

Once soft, it's time to blend the ingredients together. This is where I like to bust out one of my FAVOURITE tools in the kitchen.

Ladies and Gentlemen, I would like you meet my Cuisinart immersion blender. This thing is a lean, mean, blending machine.


Not only does it come in handy for blending soups and sauces, it also comes with a WHISK attachment which is incredible for whipping up some egg whites or whatever your heart may desire. If you don't own one, I suggest you change that as soon as possible. It's a great investment. Cuisinart makes an excellent one, as well as Kitchen Aid.

Anyways, back to the soup.

Blend the ingredients together with your handy dandy immersion blender (or regular blender, potato masher, food mill, hands, whatever you got!)


Get it to the consistency that makes you happy. I prefer my soup to be a bit on the thicker side, but you may like it thinner! There isn't a right or wrong way to blend soup. Seriously, it's just soup.

Serve hot and if you have fun toppings feel free to add them. I like to add bacon, a drizzle of olive oil and some freshly ground pepper on top.

Fun fact: When I was a kid, my Nana would make us potato soup all the time... I would add about 5 packets of crackers and make my soup into this thick, stew like substance which sounds unusual, but tasted AWESOME.


mmm, soup.


Enjoy!!

Sunday 25 August 2013

Classic Cinnamon Rolls.

Who can resist a fresh, out of the oven cinnamon roll? Seriously. If you can actually resist one, well done. I applaud you.

I used a recipe I saw in a Food Network magazine. The recipe is for a Sweet-Roll Dough that can be used in a multitude of ways. I decided to use the dough and make cinnamon rolls!

The recipe for the sweet-dough is as follows:

1/2 cup whole milk (I went rogue and used 1%)
1   1/4-ounce package of active dry yeast (2 1/4 teaspoons)
1/4 cup sugar
4 tablespoons unsalted butter, melted and slightly cooled, plus more for brushing
1 large egg yolk
1 1/2 teaspoons vanilla extract
2 3/4 cups all-purpose flour, plus more for dusting
3/4 teaspoon salt
1/2 teaspoon freshly grated nutmeg (optional...but you would be crazy to leave it out.)

This makes about 1 1/2 pounds of delicious doughy goodness.

Now, for the process.

1. Warm 1/2 cup water and the milk in a saucepan over low heat until a thermometer registers 100 - 110 degrees. It only takes a few minutes, so make sure to keep an eye on it! Once the milk is heated, remove from heat and sprinkle the package of yeast on top, and then sprinkle with a pinch of sugar (the yeast has to eat!). Set it aside and leave it alone until it's foamy. Takes about 5 minutes. It will look pretty gross, but it's also pretty cool.

2. Whisk the melted (and slightly cooled) butter, egg yolk and vanilla into the yeast mixture until combined. In a large bowl, whisk the flour, remaining sugar, salt and nutmeg together. Make a well in the centre and then add the yeast mixture and stir with a wooden spoon until it gets all thick and sticky. Turn out the dough onto a floured surface and knead it until it's all soft and bounces pack when you poke it. (Takes about 5 minutes or so). Once kneaded, shape into a ball.

3. Brush a LARGE bowl with some melted butter and then add the dough. Roll the dough ball around in the bowl for a bit to get it lightly coated with the butter. Cover with plastic wrap and let rise at room temperature until it's doubled in size. Be patient. It will take about an hour and 15 minutes.

4. After the hour and fifteen minutes when your dough has grown, turn it out of the bowl and knead it briefly to release excess air. Re-form it into a ball and return it to the bowl. Lightly butter a large piece of plastic wrap and lay it directly on the surface of the dough. Cover the bowl and pop it into the fridge for at least 4 hours or over night!


Here's what it all looks like.


The ingredients...


 Knead, Knead, Knead


All ready to rest!


After 1 hour and 15 minutes, the dough has doubled in size


Into the fridge!


 Later On...

Once everything has risen, it's time to make the Cinnamon Rolls!

Here's the recipe:
 
1-1/2 sticks (12 tablespoons) unsalted butter, softened, plus more for the pan
1/3 cup granulated sugar
2 tablespoons ground cinnamon
All-purpose flour, for dusting
The Dough.

The Glaze

1 1/4 cups confectioners' sugar
4 tablespoons unsalted butter, melted
3 tablespoons milk
1/2 teaspoon vanilla extract
Pinch of salt

1. Make the rolls: Butter a 9" x 13" baking dish. Combine the sugar and cinnamon in a small bowl. On a floured surface, roll out the dough into a 10" x 18" rectangle (feel free to bust out a ruler...).
Spread the butter over the dough, leaving a 1" border on one of the long sides. Add the cinnamon sugar. Brush the clean border with water. Tightly roll the dough into an 18" log, rolling towards the clean border; pinch the seam to seal.

2. Slip a long, taut piece of string (or unflavoured dental floss) under the roll, about 1 1/2" from the end. Lift the ends of the thread and cross over the roll, pulling tightly to cut off a piece. Repeat this process, cutting every 1 1/2" to make 12 rolls. Place the rolls in the prepared baking dish.

3. Now, for more waiting... cover the rolls loosely with some plastic wrap and let them rise until doubled in size, about an hour and 10 minutes.


Sugar & Cinnamon

 
Roll out the dough

 
Sprinkle on that sugar & cinnamon


Cut into rolls and let them rise!


After they've risen, it's time to pop them into the oven.


4. Crank up the oven to 350 degrees. Uncover the rolls and bake until they spring back when poked, about 25-30 minutes. Let them cool for 10 minutes. 


If you're freezing them, wait until they're completely cooled. They're good frozen for up to 2 weeks.

5. Now time to make the glaze. Whisk confectioners' sugar, melted butter, milk, vanilla and salt in a bow until smooth. Drizzle over the warm rolls. Try not to eat the whole batch.


Enjoy!!


The Kitchen.

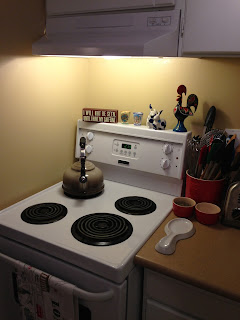
My kitchen is small, but what it lacks in size it makes up for in functionality. Cooking in a small kitchen requires some creativity. Due to the lack of counter space, I find that I have to do things in shifts.


I also have some favourite tools and cookware that I love to use on a regular basis. I believe in quality over quantity, simply because a better quality item will last you a lot longer and provide better results.

To quote Julie Andrews, "These are few of my favourite things..."


(Yes, that is a Cookie Monster spatula...)


Next up... Cinnamon Buns.
Stay tuned!


"Do you smell something burning?"

I decided to start this blog for a couple of reasons.
 
I love food and I love to talk about food.
 
I believe that food is a way of bringing people together and a delicious way to create memories with the people you love. Some of my fondest memories are from family dinners. We all sit around eating, talking, making jokes (some funny, some highly inappropriate) laughing and enjoying each others company.
 
 I wasn't always so keen on cooking though. There was a time where I couldn't cook anything without burning it. The joke was that my smoke detector was my cooking timer. ha-ha. Cooking was definitely a challenge for me for quite a long time.

Those days are obviously long gone, although I do burn the occasional piece of toast...

Cooking has now become a passion of mine. I love trying out new recipes in my (small) kitchen and preparing a meal for friends or family. I am constantly looking for new recipes to try out as well as creating some of my own.

This blog will be a place where I can share those recipes with you, along with the successes and failures that come along with the territory.

Wish me luck!